Where Grasses Meet Masts, the Edge

Give an advantage to wildlife by re-creating transitional zones between different habitat types.

By Rachel Coy-Mecurio

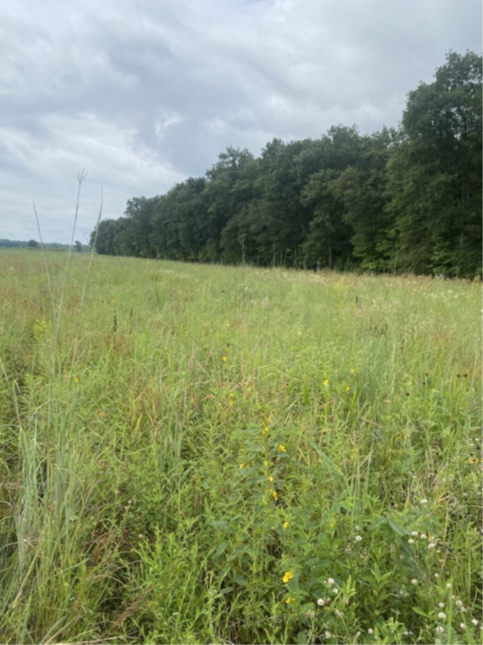
The abrupt shift from crop land to manicured lawns or to the clean lines along woodlots seem to be more prevalent today than ever. Transitional areas, or buffers between landscape types, have slowly disappeared. By softening the edges that currently exist and providing a gradient in species composition and structure, we give an advantage to wildlife that need additional coverage from predators, improve species diversity, and support other services like improving water quality. Edge feathering is a technique used by landowners to re-create transitional zones between different habitat types.

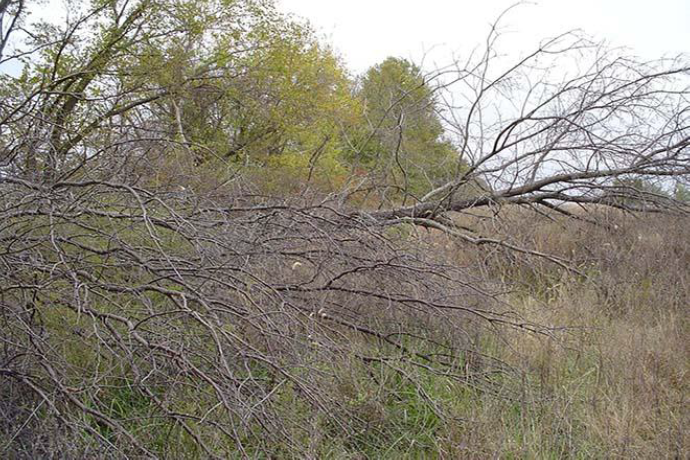
Edge feathering can be accomplished through a combination of approaches like thinning over-story trees, allowing natural regeneration to take place, or by planting species that complement your goals. If you plan to feather into a woodlot, selective cuts and manipulation of the mature trees should be completed. Cut sick or undesirable tree species, as well as any trees that exceed 4 to 8 inches in diameter. Some of the selected trees can be girdled and left standing as snags, while others can be carted away and made into brush piles to further benefit wildlife on the property. If feathering into an open space, patience is needed while waiting on seed bed germination – planting plugs or saplings can help woody vegetation establish quicker.

If you plan on planting trees and shrubs, or allowing the seed bed to sprout, site preparation may be needed, depending on the vegetation currently growing. If turf grasses or invasive species are present, herbicide may be needed to create space and resources for the desired tree and shrub establishment to take place. Edges are great hosts to species that do not perform well in mature forests, due to the lack of resources that are able to penetrate the dense forest over story, or do not survive the constant disturbance needed in a perennial herbaceous stand. Often, these are soft mast producers like Rubus, or fruit trees.

An herbaceous buffer near a wooded area. Many green grasses and forbs are growing next to the woods instead of a crop field.
Photo by Rachel Coy-Mecurio. Herbaceous buffer, not quite a textbook “feathered edge” but provides a softer transition then just a crop field meeting a wood lot.
A feathered edge with a fallen or cut down tree.
Photo by Eric Ressel, Quail Forever

Edge feathering can be simplified into three zones of management. Your three zones will all fit into a 50 to 150 foot wide space and will include:

  • Taller trees/shrubs (75% tree cover, approximately 10×10 foot spacing)
  • Smaller trees/ shrubs (50% tree cover, 6×6 foot spacing)
  • Herbaceous grass and forb zone (<25% woody cover)

The best time to treat and begin implementing a feathered edge is in the fall/winter after leaves fall off. After the edge has been established, continued management will be needed to ensure succession does not continue its course into young forest habitat. Control of any invasive species that had infiltrated the edge should be completed annually. The denser wooded areas should be re-treated when tree diameters exceed the threshold of approximately 8 inches. The grassy area should be managed on a 3-to-5-year cycle to prevent excessive woody encroachment and to continue to provide that smooth transition.

If you find yourself in a situation where the property you manage has a singular habitat type and you would like to increase resources available to wildlife on your property, practices like woodlot openings or shrub plantings within your grassland can help address these goals, too. If you are interested in implementing any of these practices on your property, reach out and I would be happy to offer additional, site-specific guidance.

Pollinator TreesWet LovingShade Tolerant Wildlife ShrubsDeer Trees
Flowering dogwoodBald cypressEastern red cedarEastern red cedarAmerican hazelnut
Eastern redbudAmerican beechEastern redbudWillow (native, not hybrid)Flowering dogwood
Black cherrySwamp white oakPawpawDogwoodRedbud
HackberrySycamoreDogwoodSilky dogwoodAmerican plum
American hollyBuckeyeSpicebushRedbudCrabapple
PlumPawpawBuckeyeAmerican plumServiceberry
Tulip poplarHackberryServiceberryCrab appleElderberry
Eastern red-cedarElderberryWitch hazelHawthorn Swamp white oak
BlueberryEastern hemlockAmerican hazelnutSpicebush
BirchBirchServiceberryPawpaw
WillowCottonwoodSumacBlueberry
PawpawEastern red cedar
SassafrasPine (for windbreaks)
Wild black cherry
Photo of Rachel Coy-Mecurio, Ohio Farmbill Wildlife Biologist for Pheasants Forever. Her bio reads "Rachel covers five counties - Richland, Huron, Erie, Crawford, and Seneca - and is passionate about helping landowners achieve their habitat goals and manage perennial landscapes. Outside of work she enjoys spending time with her husband and their two four-legged children, crafting, or just enjoying time set aside to relax."

Cultivating Health Through Gardening

Learn about the health benefits of gardening!

By Sam Foley

As winter comes to an end and spring arrives, growers everywhere are planning our plots and taking inventory of what we may need for this upcoming season in our gardens. Many of us are looking forward to being out in the sun and getting an increase in vitamin D. The winter blues are a real thing and what better way to break out of them than working outside in our gardens!

There are many health benefits to gardening. It’s a physical activity that can help keep one fit. Digging in the soil and working up a sweat is a great feeling! Watching our plants flourish and eventually harvesting our fruits and vegetables is extremely beneficial to our diets. There’s scientific evidence that getting one’s hands in the soil can greatly benefit our immune systems. For me, the biggest benefit of gardening is the positive impact on my mental health. According to Harvard Health Publishing, gardening can be a mental tonic that soothes mood, sharpens the brain, and can even fertilize relationships.

It’s easy to become caught up in the day-to-day hustle of our lives. Using gardening to connect with nature can decrease anxiety, stress, and even depression. In the garden we can become totally immersed in the day’s work of tending to our plants.  Distractions can be set aside temporarily while we sow the seeds of tomorrow’s harvest. Gardening stimulates the brain through focus and memory; even just a quick 20 minutes have been shown to improve brain activity. Gardening can also be a social experience. I’ve recently spoken to two community garden clubs in our county, and the social network I’ve seen is inspiring. These bonds have been built over the years and it’s a great opportunity to stay in touch with friends. Also, what better way to be a good friend than to share your bountiful harvest?

Sam holding a handful of dark brown soil
Richland SWCD photo

For me, just writing these articles has opened so many conversations with local growers and gardeners. Sharing our experiences and ideas with each other helps build relationships and teaches us all to be better gardeners. Chatting with folks who bring in soil samples and discussing the reports puts a huge smile on my face. I appreciate everyone who follows along with my articles and look forward to hearing about how gardening has enhanced your life and well-being!

Learn More: Harvard Health Publishing

Photo of Sam Foley, District Technician. His bio reads "Sam is passionate about sustainability and enjoying the finer things in life. He grew up in Shelby, OH, but moved to the big city and now resides with his family in Mansfield. When he’s not at work, he’s spending time with them."

Ponds and Plants

How nutrients impact your pond.

By Matt Wallace

Springtime will bring about opportunities to make new memories with family and friends around your pond, but did you experience issues with various plants last year that you may have forgotten about? Things like watermeal (green, floating, granular plant), duck weed (small lobed floating green plants with a tiny root), cattails (green in the summer and brown in the winter extending above the waterline), or broadleaf watermilfoil (submerged leaves are finely dissected and cause the shoot to resemble the form of a raccoon tail, whereas leaves on the emergent bracts tend to be smaller and appear only in summer).

All of these plants can have the potential to provide feeding, loafing, and protective cover opportunities for waterfowl, fish, and other mammals. But like so many other things, they can become a nuisance, reduce plant biodiversity, create hypoxic zones and need to be controlled. Things like watermeal and duckweed are indicators of a high nutrient load in your pond which feed off muck in the bottom of your pond. Muck is natural and comes from dead and decaying plant material that can reduce oxygen, increase nutrients, and reduce your ponds volume. The best way to correct this is by using a live beneficial bacteria coupled with pond aeration. This will reduce the amount of muck in your pond, reduce the nutrients that cause excessive plant growth, and restore lost volume. For pond advice, give us a call.

Aerial image of a big pond with green algae growing along the edges.
Drone photo by Matt Wallace
Photo of Matt Wallace, District Technician. His bio reads "Matt is a lifelong resident of the Shiloh area where he resides with his wife and their two fur babies. He has a passion for the outdoors and being a part of the CB&S Joint Fire District."

Mulch Madness

The easiest and most immediate step you can take towards healthy soil is mulching. Learn how!

By Sam Foley

I’m going to let the audience in on a secret today; I’m incredibly passionate about healthy soil. I love talking to folks about their soil test results and discussing ideas to increase soil health. The easiest and most immediate step you can take towards healthy soil is mulching. The benefits a mulch layer can add to your garden are listed below:

  • Preventing soil erosion: By covering the top layer of soil there’s greater protection from erosion during watering and rain events.
  • Retaining moisture: Mulch helps lock in moisture after watering and prevents rapid evaporation. This also helps combat drought.
  • Controls temperature: Protects the soil during times of extreme weather. Beneficial for both winter and the hot summers. This can be especially helpful in raised beds.
  • Microbes: This extra protection for the top layer of soil increases microbe activity, which in turn, greatly impacts soil health and productivity. Find the microbial activity in your soil by taking the Soil Your Undies Challenge.
  • Weed suppression: Though it’s not 100% effective, mulch greatly reduces weed pressure and makes pulling what weeds do pop up that much easier. Most weeds spread by seed, and a few inches of mulch can prevent these seeds from even making it to the soil.
Mulch and cover crops in a raised container

Mulch can be made of almost any material and is simply a cover spread over top of our growing media to enrich and insulate that media. My favorite mulches are organic options. Several examples of commonly used organic mulch are compost, leaf litter, straw, grass clippings, shredded bark, and rice hulls. Another option could be a living mulch. This could be made up of cover crops or even herbs, that grow as companions to a target crop. Living mulch can be “chopped and dropped”, cut and laid on the surface of soil, providing an additional layer of cover. Organic mulch not only provides the traditional benefits of mulch, but it also adds nutrients back into the soil as it slowly breaks down over time. This is a regenerative solution that can help build up soil health year after year.

Soil in your garden should never be left bare. Keeping soil covered with mulch and cover crops is essential to soil health. Always maintain a layer and leave mulch in place year-round. If you’re looking for guidance or just want to chat about growing, please reach out to me! Stay tuned for future articles on gardening.


Photo of Sam Foley, District Technician. His bio reads "Sam is passionate about sustainability and enjoying the finer things in life. He grew up in Shelby, OH, but moved to the big city and now resides with his family in Mansfield. When he’s not at work, he’s spending time with them."

Why Natives are Important in Landscape Plantings

Learn about the benefits of planting natives!

By Rachel Coy

Why is planting native species important?

Native plants and vegetation have historically evolved in the locations they are found, and their evolution coincides with that of the soil, water/drainage, climate, topography, and site history. These plants are adapted to the conditions of a certain area, and in nature nothing happens by accident. Good land management practices include utilizing native species to fill out resource concerns and goals before resorting to non-native alternatives. Along with the native plants being adapted to the conditions of a given site, native wildlife has been evolving and depending on these species throughout their mutual history with one another. A few examples are monarch and milkweed, bee balm and hawk moths, spice bush and the spicebush swallow tail, the list goes on and on.

Two native perennial grass stands consisting of big bluestem and indiangrass
Big Bluestem and Indiangrass

Why would non-native species be desirable?

A general lack of knowledge on the topic is usually how non-natives find their way into our landscape. Native plants can almost always address the goals of landowners without adding the potential for future landscape escapement, possibility of natives not getting pollinated for future populations, and energy being focused on conserving the WRONG species. A lot of our invasive species were brought over for one of three reasons: intentional landscape management (i.e. autumn olive on reclaimed mine land), beautification (i.e. Bradford Pear in garden beds), or the unintentional transport of the seeds/ species. To be non-native simply means the plant is growing outside of its native range. A non-native invasive is growing outside its native range, has escaped its controlled setting into neighboring landscapes, and has an advantage over the native species that grow there (i.e. prolific seed spreader, longer growing season, etc.) Additionally, natural checks that keep this species in balance in its natural range no longer exist (herbivore partners, insects and pests, disease, etc.) Plants observed in their native range typically are seen as well behaved based on observations from the species’ host territory, where it belongs and behaves accordingly with surrounding vegetation, as opposed to the transplanted site where it may have advantages over the natives on site.

A non-native perennial grass stand.
Photo from University of Maryland Extension of Giant Miscanthus, a non-native perennial grass.

What can you do?

There are a lot of non-native species that are hot commodities in landscaping! Things like butterfly bush, burning bush, miscanthus for deer hunters, and so many more. Below is a list of native alternatives to popular landscape plants:

  • Plant spice bush, red chokeberry, or red osier dogwood instead of burning bush
  • Plant Indiangrass or switchgrass instead of miscanthus
  • Plant mountain Mint (brushy herbaceous) instead of butterfly bush
  • Plant native apples or flowering dogwood instead of Bradford pear
  • Plant creeping mint or phlox instead of English Ivy
  • Plant redbud instead of princess tree
  • Plant American wisteria instead of Chinese/Japanese wisteria
  • Plant viburnum instead of privet
  • Plant ninebark instead of barberry

By utilizing natives in your landscape plantings, we are not only achieving the aesthetic factor many are drawn to, but the environmental factors that often don’t get considered.


Photo of Rachel Coy, Ohio Farmbill Wildlife Biologist for Pheasants Forever. Her bio reads "Rachel covers five counties- Richland, Huron, Erie, Crawford, and Seneca- and is passionate about helping landowners achieve their habitat goals and manage perennial landscapes. Outside of work, she enjoys spending time with her husband and their two four-legged children, crafting, or just enjoying time set aside to relax!"

Leave the Leaves

Discover options for autumn leaf management.

By Matt Christian

Fall is officially here! Now we can look forward to cool-crisp temperatures, apple picking, Friday night football games, pumpkin spice and beautiful fall foliage. Let’s go back to that beautiful fall foliage though. The color change of tree leaves is one of the many perks we get for living in the northern part of the United States. The leaves of the deciduous trees lose their chlorophyll in the fall, exposing their natural brilliant colors. Unfortunately, those colors don’t hang around too long, those same leaves fall from the trees, lose their beautiful colors and become an issue for many property owners. 

The most common, socially accepted solution to dealing with dead leaves is to get rid of them. Some people burn them, others bag them and have them hauled away with the garbage while some rake them to the road curb and have a city or township suck them up and haul them away. These are viable ways to rid yourself from these leaves, but I would like to suggest a few alternate and environmentally friendly options for you to consider.

Red, yellow, and orange autumn leaves spread out on a table.

1. Leave them- No rake

This method is pretty self-explanatory.  When the leaves fall naturally from the trees onto your lawn or landscaping, it can offer many benefits. Oftentimes people are concerned that the leaves will choke out their grass or plants and kill them. However, when leaves fall naturally, they are not typically thick enough to kill any vegetation. The layer of leaves on the ground will offer habitat to many wildlife species and as they break down over fall and winter, they will provide organic matter and nutrients to your soil, benefiting your lawn and plants.

2. Leave them- Mow them

If you’re concerned that the leaves will kill your lawn, you can let them fall, then mow over them instead of raking.The mowing (preferably a mulching mower deck) will break up the leaves, freeing your grass from a dense leaf blanket. This might not have as many wildlife benefits as not mowing them, but it will still begin the decomposition process and add organic material and nutrients to your lawn soil.

3. Pile them

Not a fan of any leaves on your lawn?  Well, you could still rake or blow them off the lawn into piles. You could place these piles off the lawn and start a compost pile. This pile would have habitat benefits to many wildlife species but would also have the benefit of providing a high-quality compost material that could then be later placed on areas where you may want to improve structure and enrich the soil. You could also add branches or sticks to the pile and offer a complex wildlife habitat.

4. Mulch them

Another option is to rake the leaves and use them as winter mulch on your flower beds.  The decomposing leaves will again offer great wildlife habitat, but they will help protect your plants’ roots, suppress weeds, preserve soil moisture and when they breakdown they will return nutrients to your soil.

What I like to do in my own backyard is this; I have a large pine tree with a small circular bed constructed around it. When I moved in, my wife and I discovered that the soil in this bed was very hard with no organic material in it. We tried to plant flowers there, but even hardy plants could not survive. So, what I do is blow my backyard leaves into piles and suck them up with my leaf blower/vacuum. The leaf vacuum slightly chops up the leaves on their way into a bag. I then empty the bags and pile them on this bed with low quality soil. By the time summer rolls around, the thickness of the leaves has decomposed to only a couple inches thick.  My plan is to keep doing this until a nice organic layer has built up and eventually plant flowers there.

My intention is to encourage people to take advantage of a free, renewable and valuable resource. Disposing of leaves can be very expensive and labor intensive, so why not utilize what is already available and at the same time improve soil on your property and benefit wildlife?

Close up of yellow and red autumn leaves
Photo of Matt Christian, Director. His bio reads "Matt hails from northern Richland County. He enjoys traveling and outdoor activities with his wife and girls, particularly walking the family dog."

Test, Don’t Guess: Importance of Soil Testing for the Home Gardener

Learn about soil testing with Richland SWCD and how to interpret results.

By Sam Foley

Background

One of the most common questions we get is “How can I increase the soil health in my home garden?” A soil test is the simple answer. Our office offers soil testing through Spectrum Analytic Inc, a laboratory out of Washington Court House, Ohio. According to Spectrum Analytic “A soil test is one’s best single guide in determining the strength of each link in the plant nutrient chain. The weak link sets the ceiling on crop yield potential. A soil test identifies the weak link or links.” These weak links are specific nutrient values where your soil may be lacking. Additionally, soil testing is a great tool for someone interested in conservation because after we know the nutrient content of the soil, we can amend only what is needed. This helps avoid applying excessive nutrients, which can be lost to runoff, and saves the grower money. A soil test is only as beneficial as our understanding of the report so I am going to use this space to describe each parameter included in the basic test and how to take the best sample you possibly can. 

How to Take a Soil Sample

Soil test results are only going to be as accurate as the sample that was collected. We have a great description of how to collect the best representative sample. Please follow this link for additional information: https://richlandswcd.net/residential/soil/#soil-testing 

Interpreting Results

You’ve submitted your sample and have received a report, so what does it all mean? Well, that’s part of what I’m here for, to help interpret these charts and graphs. I’m always happy to discuss these reports and try to always give my quick recap when forwarding results to owners. This section will provide a brief explanation of each parameter from the Basic Soil Test. 

  • pH is a measurement indicating the active acidity or alkalinity. pH is measured on a scale of 0-14. 7 is neutral, values below seven are acidic, and values above 7 are alkaline. Certain nutrients are only available to a plant within a very specific pH range, and this is why pH is absolutely crucial.  
  • Buffer pH is what is used to determine the lime requirement. The lower the buffer pH result, the more soil will resist a change in pH. In this case, more lime would be required to raise the pH to the desirable level.  
  • Organic Matter, oftentimes referred to as humus, consists of plant and animal detritus (decaying matter) that soil microbes can synthesize. Organic matter is packed full of carbon, oxygen, and hydrogen as well as macro and micro nutrients.  
  • C.E.C. stands for Cation Exchange Capacity which is a measurement of the soil’s capacity to hold exchangeable nutrients with a positive electrical charge (cations). Soils with a high C.E.C. can supply a large amount of nutrients, but they also require a large amount of fertilizer to be considered fertile. Higher C.E.C. values can indicate presence of clay and organic matter, where a low C.E.C. may indicate sandy soil, which is typically low in organic matter.  
  • Potassium (K) is an important macronutrient. It’s required for metabolic and physiological function. It also plays a role in photosynthesis and plant food formation.  
  • Magnesium (Mg) is another macronutrient. Again, it plays a big role in photosynthesis and is an enzyme activator.  
  • Calcium (Ca) is essential for many plants functions, including proper cell division and cell wall development. Also nitrate uptake and metabolism. Enzyme activity and starch metabolism also are dependent on calcium presence.  
  • Phosphorus (P) plays a major role in photosynthesis, respiration, seed and fruit production, as well as energy storage, transfer and production.  
Example soil analysis report. It provides data for soil pH, buffer pH, organic matter, CEC, potassium, magnesium, calcium, phosphorous, and potassium.

Recommendations

This section is provided based on the target crop, and if provided, yield goals. Nutrient recommendations are given in pounds per acre and can easily be converted to match one’s target area. Not only are nutrient recommendations provided but also recommendations for adjusting pH to the desired level. Lime is prescribed in situations where pH is too acidic, and sulfur is used to lower pH when soil is too alkaline. Following the provided recommendations should result in more ideal production in one’s garden.  

Conclusion

If you’ve ever considered testing the soil in your home garden hopefully this article has provided a good overview of what to expect from the test report and how to begin to interpret those results. Soil testing is a great tool in the conservationist’s belt. Only applying what is needed saves time, money and resources. By following the recommendations provided we can begin to build up our soil into the healthiest state it’s been in a long time. Stay tuned for future articles as I plan to explore more ways to build up our soil by increasing levels of organic matter via composting.  

Soil test bag full of soil

Learn More

Photo of Sam Foley, District Technician. His bio reads "Sam is passionate about sustainability and enjoying the finer things in life. He grew up in Shelby, OH, but moved to the big city and now resides with his family in Mansfield. When he’s not at work, he’s spending time with them."

My Humble Beginnings with Vermicomposting

Join Sam as he digs into the world of worm composting!

You may remember way back to our Autumn 2024 newsletter when I composed “Small Space, Big Impact: Urban Composting”. In that article I shared a brief overview of a couple common composting practices. That article didn’t mention it, but I was simultaneously starting my own journey with vermicomposting at my home in Mansfield, on my front porch. I purchased roughly 1,000 worms (~1lb) and set up my Worm Factory 360, shown on the right. Everything seemed to be going smoothly until the very next morning I discovered every single one of my worms had escaped. Little did I know that I missed a crucial first step that would ensure my failure. I’m going to use this article to provide some basic information on vermicomposting and point out some tips I’ve learned along the way.

Losing my first batch of worms was a letdown because not only was I looking forward to composting, but I had also invested a lot of money in this. In 2025, one pound of worms is approximately $50.00 plus tax and shipping. Some friends and family have asked me, “Sam, why don’t you just dig up some worms in your yard and use those?”, to which I respond only a small number of worms are useful for composting. The Rodale Institute states that typical earthworms are soil dwelling, don’t process large amounts of food waste and don’t reproduce well in confined spaces. The most commonly used worms for composting are Eisenia fetida, referred to as Red Wigglers. According to Rodale Institute, red wigglers are preferred because they have a quick reproduction cycle, feed near the surface of their substrate and are communal, meaning they don’t mind sharing living space with others. These worms are also rapid feeders; under ideal conditions a colony can recycle half their weight in food scraps daily (NCSU).

Red wiggler worms in Sam's worm factory 360
Sam’s Worm Factory 360

So where did I go wrong and what have I learned? Well, the biggest issue with my first batch of worms was improper acclimation to their new home. After setting up my bin, I closed the lid and walked away. I should have placed the open bin under an artificial light source for 24-48 hours. NCSU states that worms have a distaste for light and will tunnel into their substrate when light is present. Introducing light in those critical first couple of days teaches the worms to burrow downwards and explore their new space. I also went quite light on substrate; worms need space to move around and explore so loosely fit as much substrate as possible in your given container. So, with a few lessons learned I decided to buy another thousand worms and give it another go. At the time of this writing, I am about a month in, and it is going very well! I am feeding the worms kitchen scraps about once a week. So far, their feedings have consisted of eggs shells, used coffee grounds, carrots, various potatoes, blueberries, strawberries, celery, zucchini, squash, and green beans. I freeze my food scraps for a few days before feeding to help break down cell walls for quicker recycling. In these early stages it’s critical to temper your expectations; not every single scrap is going to be able to make it into your bin. Make sure the previous week’s feeding has been mostly consumed before adding in another. One could start with more worms for faster composting and the ability to compost more items at a time as well. Also remember that what you put into your compost is what you’re going to get out of it.

Kitchen scraps consisting of potatoes, cucumbers, and more in a bag.
Kitchen scraps to be fed to the worms
Kitchen scraps and shredded paper in the worm factory
Kitchen scraps in the Worm Factory 360

It feels great to be keeping these scraps out of the landfill and I’ve truly noticed a decrease in how much rubbish we are setting out at the curb each week. I never realized how much we were throwing away until I started collecting it. I’m also really looking forward to having some fresh “black gold” for the garden and all our various houseplants. Composting is something my son is interested in as well and it’s been a fun bonding experience for us both. I think it’s important to get the kids to think about conservation early and this is a perfect way to do that. Thanks for reading this far and stay tuned to our newsletter for future updates on my composting journey!

Learn More!

Photo of Sam Foley, District Technician. His bio reads "Sam is passionate about sustainability and enjoying the finer things in life. He grew up in Shelby, OH, but moved to the big city and now resides with his family in Mansfield. When he’s not at work, he’s spending time with them."

Seed to Shelter: Establishing Native Cover for Wildlife

Seasonal tips for seeding, establishing and managing native stands.

Summer and fall are the perfect time to start preparing the land you’re considering changing to native wildlife cover. Whether you’re converting an old crop field or a turf grass/ lawn conversion, let’s discuss how to get the most from your planting.

Agricultural field conversions are easiest to complete due to the weed bed being suppressed for food production, and post-harvest you’re planting in a rather clean seed bed. Fields coming out of soybeans are the ideal landscape to plant in. If coming out of corn, fodder may need to be raked and baled off for adequate seed to soil contact.

Lawn conversions require a bit more site preparation than agricultural field conversions due to the aggressive nature of turf style grasses. Mow and allow the vegetation to grow back at least 6 inches. Then follow up with multiple blanket-herbicide applications, one application in the fall and spring are necessary to kill off the current cover. There are other methods for terminating grass cover currently established on the site if herbicides are something you’d like to steer away from, but each method has its own drawbacks on the environment and your planning timeline. Repeated tillage, solarization via black plastic and putting the parcel into a crop rotation for a few years are options as well.

When planting native stands, you can either drill in the seed or broadcast it across the surface of the soil. When drilling, ensure you’re using a Great Plains, native, no-till grass drill as native seed needs planted no more than 1/8 – ¼ inch below the soil surface. In my professional opinion, using a drill is most effective during the spring planting time frame, whereas broadcasting is most efficient in the dormant frost seeding season. By broadcasting seeds in the dormant season, we are able to mimic processes that occur in nature. The best time to broadcast seeds in this time frame is after a light snow. This way you’re able to see the seed as it’s placed across the landscape, ensuring an even rate of coverage. Set your broadcast spreader to ½ the recommended rate per acre and complete two passes, perpendicular to one another, for the most even coverage. When seeding native species, the planting windows are as follows: spring season (Mid-March – June 1) and the dormant season (December – Mid-March). Plating oats with the native seed is a great way to control soil stability in the first year of growth in the stand while native plants focus on their complex root structure.

A harvested soybean field and a clear blue sky
Harvested soybean fields are some of the best prepped sites for planting conditions.
A person on a tractor that is pulling a no-till grass drill across soil
Fescue conversion to native seeding using native, no-till grass drill. Image courtesy of Jason Jones, Pheasants Forever.

In the first growing season of the stand’s life, multiple growing season mowings will need completed at a height of 10-15 inches. These mowings will reduce the completion the forbs receive from the grasses and allow for a more even mix in the stand. After the first year of establishment, full stand mows should never be completed, and a long-term adaptive maintenance plan should be generated and followed.

Once your stand is an established grassland, maintenance is required. Historically, nature did this for us, but human intervention has allowed many of our natural grass spaces to revert to early successional woodland habitat. The best tool for maintaining grassland habitat is prescribed burns done on 3–5-year return intervals. This will remove the thatch layer from the previous year’s growth as well as kill off any woody vegetation that may have infiltrated the stand. Spring burns encourage native grass growth whereas fall burns tend to generate more forbs or wildflowers in subsequent years. A good goal to keep in mind is to keep ½-2/3 of the stand standing entering each dormant season to provide continued resources and habitat for wildlife. Cycle through the field and by year 2-3, the field should have gone through a completed management round, and it is time to repeat.  

Burns can be hard to accomplish with so much red tape in the way, lack of personnel and climatic conditions (i.e. draught) so utilizing mowing and tillage for management is a great alternative. Mowing for stand management should be completed after the primary grassland bird nesting season, March 1 – July 15. I encourage mowing management to be completed by mid to late August to allow for regrowth and better over winter habitat for wildlife and pollinators. Mowing maintenance should take place on 1/3 of the acreage and be cycled through similar to fire management. Depending on how much thatch accumulates on the stand, raking this cut vegetation may be necessary to avoid smothering desired growth and retain access to the bare soil.

Disking is also an excellent tool for creating additional bare ground in a dense stand, as bare ground is part of a pristine habitat for both wildlife and pollinators, and tillage helps rejuvenate the seed bed and allows annuals to flush out again. Be cautious of disking in areas with a history of invasive and noxious weeds, as disking will expose the existing seed bed and allow room for these unwanted species to take off. If this happens, don’t worry. Reach out to your local conservation office and we can help solve the issue, though following up with the establishment mowings during that following growing season is a great place to start to reduce annuals appearing in the plot. Some landowners are interested in the addition of food plots or shelterbelts near or adjacent to their grassland stands, which we can discuss more in another article.

For more information on establishing native cover reach out to Rachel Coy.

Photo of Rachel Coy, Ohio Farmbill Wildlife Biologist for Pheasants Forever. Her bio reads "Rachel covers five counties- Richland, Huron, Erie, Crawford, and Seneca- and is passionate about helping landowners achieve their habitat goals and manage perennial landscapes. Outside of work, she enjoys spending time with her fiancé and their two four-legged children, crafting, or just enjoying time set aside to relax!"

Hot Weather, Heavy Rains and Ponds

Hot weather and heavy rains can stress ponds and create drainage issues. Learn simple ways to keep your water healthy and your yard dry.

With extremely hot weather and heavy rapid rains ponds can get stressed due to the potential for the water column to flip and/or an influx of nutrients from nearby properties. As a result, you might see rapid water level increases and algae or aquatic plants growing. These things may cause an oxygen depletion in the water column and could cause a fish kill.

So, the question then becomes how do we fix some of these things? Algae blooms are driven by high nutrient loads within ponds which come from leaves, grass clippings, fertilizers and other material deposited into your pond. While a little bit of this material, commonly known as muck, is normal and can be broken down within the aquatic ecosystem, too much of it can be harmful. How do you tell if you have too much muck in your pond? Simply by walking around the inside edge of your pond! Pay attention to how much you sink into the inky black material and how it envelopes your feet and legs. The deeper you sink, the more of this highly nutritious, nutrient laden muck your pond has. The best way to help your pond digest muck is by adding beneficial bacteria, which are live active bacteria that help break down the muck and restore the volume back in your pond. Often the more muck that is in the pond, the more treatments you will need which are generally completed in the spring and fall of the year. Pond aeration can also help by increasing oxygen levels and boosting bacterial activity.

For sparse rooting and floating aquatic vegetation adding species of fish like grass carp, tilapia (which will not over-winter in Ohio) or channel catfish that eat these plants will also restore volume to your pond. There are occasions where you may want to consider dredging your pond and we recommend that you contact a Richland SWCD technician who can help make recommendations. By increasing the volume and supplementing oxygen in the pond you will help make your investment not only look better but be more hospitable for the fish and other aquatic friends within. Some additional things you can do to help your pond is by leaving the grass taller around it to help filter out sediments and nutrients that could come in from overland flow. You can also utilize native switch grass plantings, often times marketed as ornamental grasses, in areas of high flow. In which they will help slow down water, increase water infiltration, and help reduce sediments and nutrients from overland flow.

Wet Spots and Your Property

Do any of these look familiar to you?

Ponding water in a farm field
Puddle in a grass lawn
Rill erosion in a farm field

When it comes to wet spots in yards and fields there are options for landowners to improve drainage. Some options may be more appealing due to financial cost, topographic feasibility or personal capabilities. In no particular order things that homeowners can choose from are:

  • Installing a tile to remove surface water if you have an area on your property that can allow it to drain without causing you additional issues.
  • Installing a French drain to help with potentially excessive rainfall inundation.  
  • Adding soil amendments like gypsum, perlite and organic matter
  • Reshaping the low spot so that it has positive drainage.

These options can also help with areas that retain rainwater for long periods of time, we may recommend obtaining a soil test before selecting one of these potential solutions so that you get more bang for your buck. The Richland Soil and Water Conservation office can offer assistance over the phone but usually a site visit is recommended so that we can visually observe the entirety of your concern. Services like this are provided to the public for free.

Photo of Matt Wallace, District Technician. His bio reads "Matt is a lifelong resident of the Shiloh area where he resides with his wife and their two fur babies. He has a passion for the outdoors and being a part of the CB&S Joint Fire District."